|
Teaching cursive is fun, easy, and has great pay-off. Cursive can be especially supportive to those that struggle with forming print, reversing letters, eye-tracking, or reading. Not convinced it’s worth it? Check out these articles that explain some of the benefits of teaching cursive. Literacy Benefits: Scholastic.com Biological and Psychological Benefits: PsychologyToday.com Daily Wonder recommends teaching cursive as soon as grade two, when your child knows all the letters, knows their sounds, and is beginning to understand the rules for encoding (spelling). We recommend that the archetypal forms are brought in order of difficulty rather than letter by letter. Below is a step-by-step guide to bringing the forms that are the basis for the letters. Remember, any new skill needs daily practice to become a capacity. We recommend that once you have brought all the forms/letters that cursive then becomes your expectation for all written work. It can take a whole year to become a natural at cursive but just think of all the brain pathways you will create and strengthen in your child, what a gift Lesson 1: loops You’ll teach your child all the letters/forms in lower case first, they can print the capital letters until they have mastered all the forms, then you’ll bring the upper case. The looping letters are the first lesson in cursive. Have your child practice creating the loops, big for l, small for e, across several lines of a lined book. You don’t need to tell your child that these are the letters, just have them practice the form of the loops. Remember to show the areas for placing letters on the page as in the example. You can have your child join the tall and short loops all together to practice the size of them on the lines for today. They can try eeeelllllll or elelelelelelele across the page in cursive.  Lesson 2: points Make sure you have practiced the looping forms for a couple of days before you move on to this second form. The second form is the pointing form as in the letters i and t without the dot or cross. They’ll be practicing the motion and size of coming to a point, unlike the loop. They can try iiiiiiiiittttttttt or itititititititit across a couple of lines. Be sure to indicate the height of each line or loop using the imaginative image of the sky, earth, and sea.  Lesson 3: bringing letters Take this day to practice cursive that you’ve brought so far. Show your child how the e loop is an /e/ the l loop is an /l/ the i point only needs a dot to be an /i/ and the t point only needs a cross to be a /t/. Support them to cursive write all the words they can think of with these letters: let, lit, tell, till, little, lilt. Give feedback about the size of the letters in comparison to each other and their form and starting place. Lesson 4: wave Today you’ll bring a new form, the wave. Guide your child to practice the wave letter form like for ‘c’. This curving line makes up the base for ‘a’, ‘c’, ‘d’, ‘g’, ‘o’, and ‘q’. Have them try just cccccccc, then switch to cececlclcl and cicicictctctct.  Lesson 5: wave, point, loop Today guide your child to practice the wave and point together that form the a in cursive. They can do a line of ‘a’ and ‘d’ and then combine other practice letters such as ‘cat’, ‘tall’, etc. Take your time. If the ‘a’ isn’t making sense, don’t go ahead to adding other letters.  Lesson 6: down and loop Before beginning, make sure that your child has had plenty of practice with previous forms. The next lesson is to guide your child to practice the down and loop line, as in j. Remind your child the difference between: sky, where letters reach way up; earth, where letters always begin; and sea, where some letters reach way down. Show them the ‘j’ without the dot and notice how your child crosses the line to loop, this can be tricky. Practice as much as is needed, combining other practiced letters as is appropriate.  Lesson 7: point and hump For this lesson, you will guide your child to practice the point and hump as in the h, m, and n. They can combine skills now to try words such as ‘line’, ‘men’, ‘hen’, etc. The point of the ‘h’ can transform to a loop if that is the style you choose, either a point or loop is acceptable.  Lesson 8: wave, point, and down loop Remember to ensure you give lots of time for practice before moving on to the next form. This lesson will have you guide your child to practice the ‘d’, ‘g’ and the ‘y’. They can create words once they master these two that are a combination of the ‘a t j’ lines.  Lesson 9: point Time for practice, then guide your child to try the ‘u’, ‘v’ and ‘w’ lines that are point lines. Again, they can take some time to practice any words they can spell with letters they know  Lesson 10: loop and backwards wave Today you will guide your child to practice the ‘b’. This is a tricky one that is a loop followed by a backwards wave. Provide some time to practice any words they can spell with letters they know.  Lesson 11: point and curve Today you will guide your child to practice the ‘o’ and ‘p’ which include point and curve lines. As always, once they have practiced and feel confident, they can take some time to practice any words they can spell with letters they know.  Lesson 12: double loop Today’s form is another tricky one, the double loop. The letter ‘f’ can be formed with a double right side loop or with a reverse at the center. In our experience the double right is a bit easier for some children. You choose what is right for your child. Once they have the hang of it they can take some time to practice any words they can spell with letters they know.  Lesson 13: wave, point, loop This one is my favourite! The full wave followed by a point on the earth, followed by a waving loop! The letter ‘z’. When they feel confident, take some time to practice any words they can spell with letters they know.  Lesson 14: point table, point curve Your next forms make the letters ‘r’ and ‘s’. Again, they can take some time to practice any words they can spell with letters they know.  Lesson 15: final forms There is no easy combo for the remaining letters x, q, and k so we’ll practice them as the final and most challenging letters. The x requires a lift of the pencil, the k requires a switch in direction, and the q also requires a switch in direction. Take it slow, follow your child’s lead. If you need to do one each day to avoid confusion, take that time. After these final letters, they should be able to form all the lower case letters and will need lots of support to keep practicing. You can bring the upper case letters as needed when your child is writing. If you embrace cursive as the way to write, they will too:)  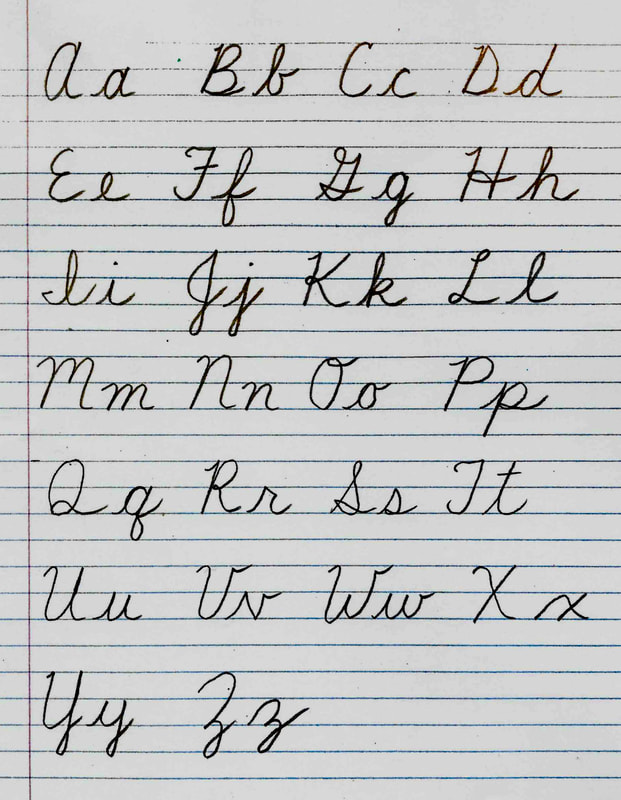
2 Comments
Leave a Reply. |
BlogExplore schedules, rhythms & routines, songs, music, festivals, free play, meals, projects & more to support your homeschooling program.Categories
All
Archives
July 2024
|
 RSS Feed